How to Assemble Your Dream Ultralight Backpacking Kit
Have you ever set off for a multi-day thru-hike into the wilderness and began to struggle with each step? You’re trekking up the switchbacks to enjoy nature, all while your back and feet are aching. Maybe you didn’t assemble your backpacking gear properly. Or perhaps you overpacked. If this sounds all too familiar, it may be time to give ultralight backpacking a shot.
Going the ultralight backpacking route doesn’t mean you’re cutting out essential items. It just means you’ll only be carrying the gear you need without overburdening yourself. Plus, you’ll be able to cover more mileage on the trail while having more energy and enhanced maneuverability
Have a serious desire to become a die-hard minimalist and shave off every last ounce from your backpacking loads? Read our guide to learn how to assemble your dream ultralight backpacking gear kit.
Backpack
Traditional backpackers may choose to lug around a 65-liter pack, weighing up to 30 pounds. The ultralight backpack should ideally weigh under 2 pounds. The volume of the pack will depend on how many days you plan to be out and the gear you have, but we recommend finding a minimally-padded, frameless 30 to 60-liter pack that can hold your consumables. Always test out different backpacks to ensure they fit correctly and are comfortable.

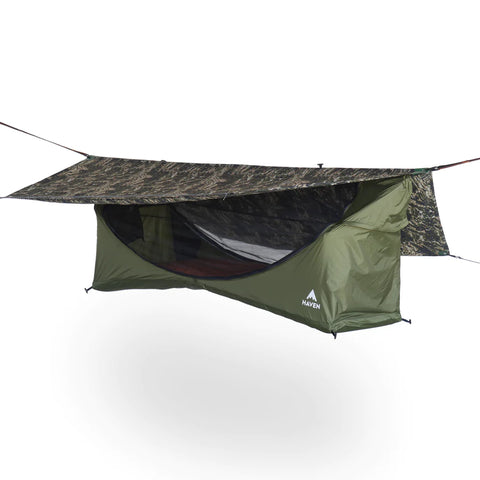
Shelter
Shelter is typically the heaviest part of your ultralight kit. As an ultralight backpacker, you have a slew of shelters to choose from. One popular option is an ultralight tent. Not only do these shelters provide superior protection, but they’re also easy to set up and affordable. Opt for double-walled tents with an inner tent body and an outer rainfly for more storage and better ventilation.
Next up is a tarp shelter. You’ll love just how lightweight, versatile, and affordable they are. Unfortunately, although tarps protect you from rain, they don’t come with a floor or bug netting. Also, keep in mind that many tarps require the support of poles.
Hammock tents should be your go-to choice to elevate your lounging game. They’re lightweight and compact, and you only need a pair of trees to hang them. They make a great spot to nap, read a book, or take in the beauty around you.
Last but not least are Bivy sacks. These are for the committed minimalist. Also known as a bivouac sack, these shelters are waterproof, breathable slipcovers that fit your sleeping bag and a pad. They shut out bugs and rain but may not be ideal for downpours.
Sleep System
If there was a category to add ounces to, this is it. Getting a good night’s sleep is essential when backpacking through the wilderness. You’ll want to find the lightest possible sleeping bag and pad for your conditions while still being comfortable.
There are two sleep systems: closed foam cell pads and air pads. We recommend the closed foam cell pad if you’re looking for a durable sleeping pad that won’t pop or puncture. The downside? They’re not the most comfortable and tend to be a bit bulky.
If comfort is your number one priority, you can’t go wrong with an air pad. Not only are they more comfortable than foam pads, but they’re also compact and easy to carry around. Make sure to bring a small repair kit in case it gets punctured and deflates.
As for sleeping bags, opt for a traditional mummy sleeping bag or quilt that weighs less than 2 pounds.
Cooking Systems
What’s a backpacking trip without some outdoor cooking? For ultralight backpacking trips, there are only three types of backpacking stoves to consider: Traditional isobutane/propane (gas), denatured alcohol stoves, and Esbit (solid fuel). You’ll also need a durable and lightweight cook pot that weighs under four ounces.
If you go stove-less to shave off some weight from your pack, you can carry food in a plastic tub with a screw-on lid and a spoon. Simply dump your food inside a pot, add cold water, screw on the lid, and wait until the food has rehydrated. Although the no-cook method is the most lightweight and convenient option, it’s not for everyone. After all, who doesn’t love having a hot cooked meal at the end of the day?
Wallet
A wallet may not be the first thing you think about when planning a backpacking trip, but it’s still important. Minimalist wallets align with the ultralight backpacking mindset - To keep things simple and lightweight without sacrificing quality or performance.

That’s where the Groove Wallet comes in. As a high-quality and low-profile wallet, it provides easy access to your cards with the natural motion of a single-thumb swipe. You get a machined aluminum wallet that is more durable and premium than any other wallet out there. It has space for up to 6 cards (plus 3 with our premium leather attachment), which we found is perfect for minimalist users.
Ready to begin your ultralight backpacking adventure? Get started by checking out our website today to find the perfect gear for your next trip!
Groove Life®. Ready for Adventure™.